How to Create an Amazon Storefront: A Step-by-Step Guide
Have you ever browsed Amazon looking for a product and noticed that some brands have sleek, custom-designed pages? With millions of shoppers hitting Amazon every day, having a personalized storefront is like owning prime real estate in the world’s largest online marketplace.
But how exactly do you create one? Is it complicated? Let’s walk through it step by step, so you can get your storefront up and running without breaking a sweat.
What is an Amazon Storefront?
Before we get into the “how,” let’s cover the basics. So, what exactly is an Amazon Storefront? In simple terms, it’s a dedicated, customizable page on Amazon where you can showcase your brand and products. Think of it as your own mini-website within Amazon. It’s a space where you can feature your best sellers, share your brand’s story, and engage directly with customers.
To give you a better idea, let’s compare two storefronts. On the left, there’s a regular seller’s store, where the products are only displayed on standard Amazon product pages with no additional branding. On the right, you have a brand’s storefront with a clean and appealing header and well-organized layout.

It’s obvious which one makes you feel more inclined to buy, right? A well-designed storefront not only looks more appealing but also makes people feel more inclined to buy.
Why should you create an Amazon storefront?
Why go through the effort of building a storefront? It’s not just about aesthetics—it brings real benefits that can boost your success. Let’s break down some key reasons why it’s worth the effect.

Build a Strong Brand
An Amazon Storefront allows you to showcase your brand in a way that standard product listings can’t. By using videos, images, and product comparisons, you can tell your brand’s story and highlight what makes you unique. A visually appealing and organized storefront also makes it easier for customers to find what they need, improving their shopping experience. A strong storefront doesn’t just move products—it builds brand recognition and encourages repeat customers.
Build trust and loyalty
A storefront shows customers that you’re a legitimate brand, not just another random seller. It presents you as a professional, and customers are more likely to trust a well-organized, branded space. When people feel confident about their purchase, they’re more likely to come back, and that’s how you build loyalty over time.
Avoid competitors’ Ads
One big advantage of having a storefront is that it’s an ad-free zone for competitors. Unlike standard product pages where ads for other brands pop up, your storefront keeps the focus solely on your products. This way, you control the shopping environment and keep distractions to a minimum.
Leverage exclusive marketing tools
One of the best perks of having a storefront is gaining access to advanced marketing tools like Sponsored Brand Ads. These allow you to promote your storefront across Amazon, driving more traffic and increasing your brand’s visibility to potential customers. It’s a great way to stand out in a crowded marketplace.
The requirement of creating an Amazon storefront
Not every Amazon seller can create their own storefront. Before you get started, here are the key requirements you need to meet::
A professional seller account
First off, you’ll need to have a professional selling plan, which costs $39.99 per month. Unfortunately, individual seller accounts don’t offer access to the storefront feature.

Enroll your brand in the Amazon Brand Registry
Enrolling your brand in the Amazon Brand Registry is a must. To be eligible, you need to have either a pending or registered text-based or image-based trademark, along with its registration number.
Being part of the Brand Registry not only allows you to create a storefront but also gives you more control over your product listings.
A step-by-step guide for creating an Amazon storefront
Let’s walk through the process of creating an Amazon storefront step by step.
Step 1: Become an Amazon Brand Registered Seller
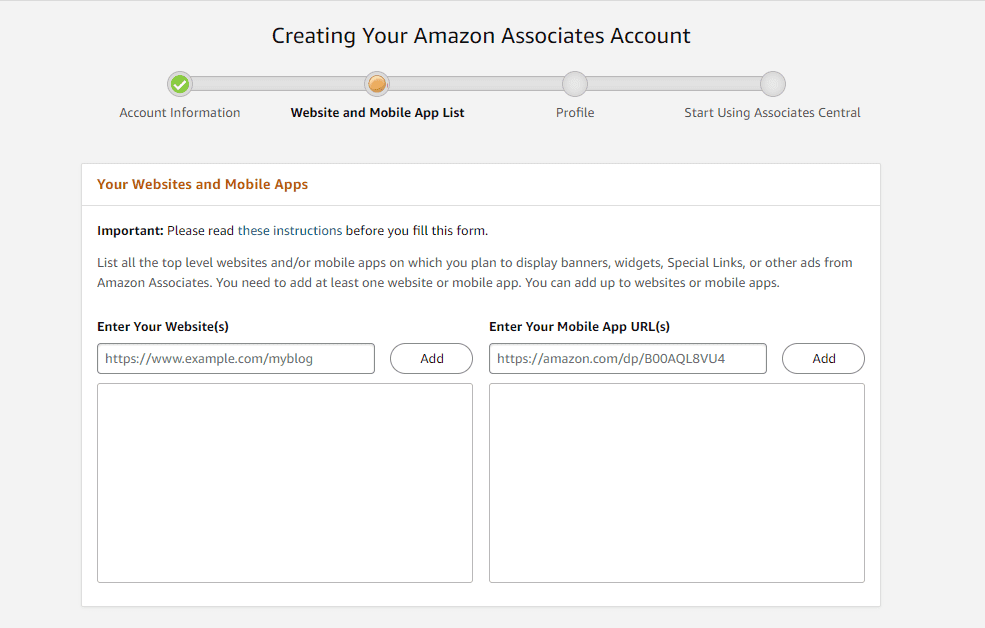
First things first—you need to enroll in the Amazon Brand Registry. This is a critical step because only brand-registered sellers are allowed to create an Amazon Storefront.
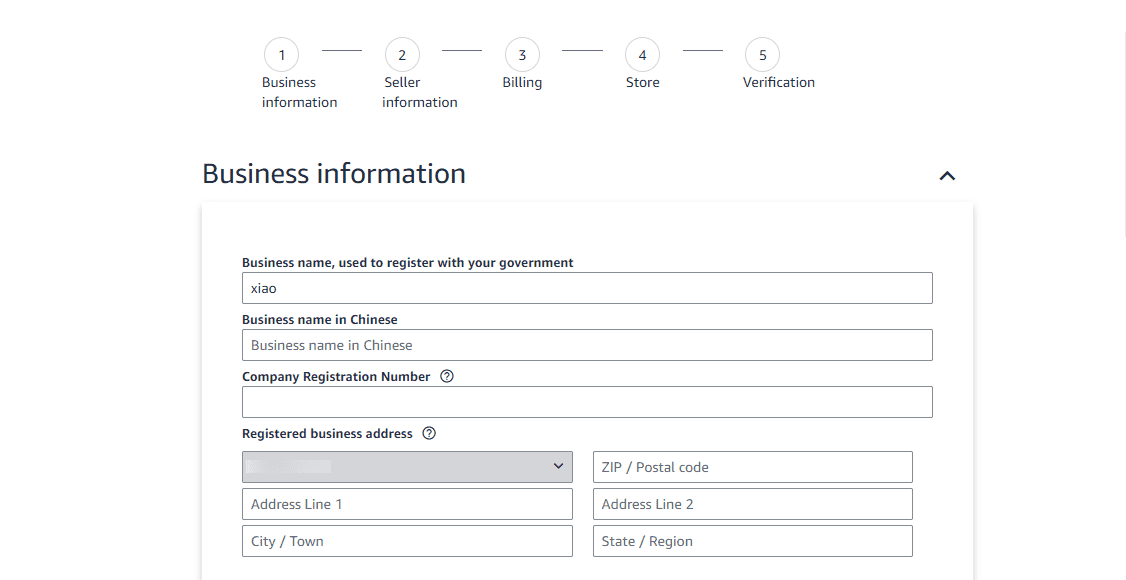
How to register for Amazon Brand Registry?
1. Sign in and visit the Brand Registry page: Head to the Amazon Brand Registry page and log into your account.
2. Submit your brand and business info: Fill in details about your brand, including business information, manufacturing, and distribution details.
3. Verify your identity: Amazon will send a verification code to the registered trademark owner. You’ll need to provide that code to complete the process.
4. Wait for approval: After submitting your application, Amazon will review everything and notify you once you’ve been approved.
For more details, check out the official Amazon Brand Registry Guide.
Step 2: Access the Amazon Storefront Builder
Once you’re brand registered, you can access the storefront builder. The Storefront Builder is a drag-and-drop tool that makes it easy to create a professional-looking storefront without needing to know any code. Here’s the guide:
1. log into Seller Central and click on the “Store” tab in the menu.

2. Choose the brand you want to create a storefront for and click “Create Store.”
3. You’ll be taken to the Storefront Builder where you can start designing your pages

Step 3: Build Your Homepage
Before jumping into adding products and images, take a moment to plan your store’s structure. Think of it like setting up a physical store—what do you want your customers to see first?
1. Choose a template: Amazon provides four templates to help get you started:
- Marquee: Ideal for telling your brand’s story while showcasing product categories.
- Product Highlight: Perfect for emphasizing specific products or promotions.
- Product Grid: Best for displaying a wide range of products at a glance.
- Blank: Offers complete freedom if you want to customize everything from scratch.

2. Add a header: Your header sets the tone for the entire storefront. Make sure to include your brand’s logo and a compelling banner image. Follow Amazon’s guidelines on banner size and quality to ensure it displays correctly. A good header helps create a cohesive brand identity and catches the customer’s attention right away.
3. Choose tiles: Tiles are the key elements that make up your storefront. You can add different types of tiles, such as:
- Product tiles to feature your top-selling items
- Image tiles to showcase high-quality visuals
- Text tiles to tell your brand’s story or promote special offers
- Video tiles to engage customers with dynamic content like product demonstrations or background videos
A well-structured homepage should offer a mix of these elements to provide a seamless and enjoyable shopping experience for visitors.
Step 4: Add Subcategory Pages
After you’ve built your homepage, it’s time to add subcategory pages to organize your products. Subcategory pages help break down your inventory into easily navigable sections. This is especially useful if you offer a wide range of products.
- Decide on your categories: Think about how your customers would search for your products. You might want to organize them by type (e.g., electronics, clothing) or by use (e.g., gifts, daily essentials).
- Add product collections: Each subcategory page should highlight a specific group of products. For example, if you sell beauty products, you could have subcategories like skincare, makeup, and haircare.
- Include relevant images and text: Make sure each page has visuals that align with the category and brief descriptions that explain what customers will find in that section.

Subcategory pages make it easier for customers to find exactly what they’re looking for without getting lost in a sea of unrelated products.
Recommended read: How to Sell on Amazon From Alibaba to Make Money 2024
Step 5: Check and Publish Your Storefront
Before you hit “publish”, remember to take some time to check it. Here are some key areas to review:
- Navigation: Ensure that customers can easily navigate your storefront.
- Mobile Optimization: Check how your storefront looks on mobile devices. Many customers shop on their phones, so this is crucial.
- Consistency: Make sure your branding is consistent across all pages. Fonts, colors, and imagery should align with your brand’s identity.
- Spelling and grammar: Small details like these matter for professionalism and trustworthiness.
Step 6: Promote Your Amazon Storefront
it’s time to promote it! Use Amazon’s marketing tools like Sponsored Brand Ads to drive traffic to your store. You can also share your store link through social media, email newsletters, or your website to reach more potential customers.
Tips for Optimizing Your Amazon Storefront
Once your storefront is live, you’ll want to ensure it performs at its best. Here are a few tips to help you optimize it:
1. Use High-Quality Visuals
It might sound obvious, but it’s crucial. Always use high-resolution images that present your products in the best possible way. Blurry photos can turn off potential customers. If you can, add lifestyle images to show your products in real-life settings.
2. Update Your Content Regularly
Keeping your storefront fresh and relevant is key to keeping customers coming back. Regularly update your storefront with new products, seasonal promotions, or special offers. Use customer reviews and feedback to make improvements to your storefront. A stale storefront can make your brand seem inactive or outdated.
3. Focus on SEO
Use relevant keywords in your product descriptions and content blocks to boost your visibility in search results. Also, optimize the metadata for your storefront to improve your rankings on Amazon.
4. Monitor Performance with Insights
Amazon provides tools to help you track how your storefront is performing. Pay attention to analytics like traffic, clicks, and conversion rates. Use this data to identify areas for improvement and tweak your storefront to better meet your goals.
FAQ About Creating an Amazon Storefront
1. Can anyone create an Amazon storefront?
No, not everyone. You’ll need a professional seller account, and you must be enrolled in the Amazon Brand Registry to create a storefront.
2. Do I have to pay for an Amazon storefront? How much does it cost?
Creating an Amazon Storefront is free. There is no additional cost for the storefront feature itself. However, if you want to promote your storefront through Sponsored Brand Ads or other marketing services, the costs will vary depending on your budget.
3. Can I create multiple storefronts for different brands?
Yes! If you own multiple brands that are enrolled in the Amazon Brand Registry, you can create separate storefronts for each. Each storefront will be tied to that specific brand’s products and identity.
Conclusion
Setting up an Amazon Storefront is a fantastic way to stand out in a competitive marketplace. Whether it’s to highlight your brand or improve product visibility, optimizing your storefront can make all the difference.
However, running an online business involves much more than just creating a storefront. That’s where Sup Dropshipping comes in. We take care of the heavy lifting, from supplier sourcing to inventory management and shipping solutions, so you can focus on building and fine-tuning your storefront. Contact us today, and let’s work together to grow your business!
About the Author

May
May is a blogger at Sup Dropshipping with over 5 years of experience in eCommerce. May’s passion for eCommerce drives her to stay updated on the latest trends and share her expertise with you through her blog. In her spare time, she likes to read a novel or chat with friends.


Leave a Reply